
Streaming and capturing CSGO without -allow_third_party_tools
Intro (And techno babble)
As a broadcast engineer on the side, I’m always looking for new ways to push the envelope for quality and process. While messing around with NDI Tools 5 I came across NewTek & Nvidia’s NDI Screen Capture HX. I had messed with it a bit in the past but hadn’t realized the potential it had for livestreaming and broadcasting in general.
The process itself utilizes NDI|HX 3, which is a version of NewTek’s NDI or Network Device Interface video-over-IP technology. Typically NDI is a very CPU intensive process that sends a very high bitrate stream over your network (anywhere from 100—400+ Mbps). This is typically very useful for broadcast applications, but requires a very capable (at least Gigabit) network and a hardy CPU.
NDI Screen Capture HX utilizes NDI|HX 3, which is a significantly lighter weight solution for sending network video. The engineers over at NewTek and Nvidia have achieved some magic with this standard, as the screen capture solution utilizes a Nvidia GPU’s hardware video encoding chips in order to capture screen output and encode/decode. This alongside some other encoding magic (which you can read about here and here) allows you to capture and encode up to 4K video at claimed frame rates of up to 120fps and higher while only utilizing up to 85 Mbps of bandwidth on your network. I haven’t tested the 4K 120fps claim, but I have tested at 60fps at 1080p for the purposes of this article, which we’ll get into shortly.
Now here’s the real question, why this solution over hardware screen capture or just using -allow_third_party_software? The beauty of this technique is that it allows you forgo purchasing an expensive capture card and prevents you from having to play the game in fullscreen windowed while also nuking your trust factor.
Note: Before you go around wondering “well this is third party software isn’t it, so isn’t this sorta cheating the system?” its important to understand that this method just captures your computer’s display output inside of the GPU before it reaches your screen and it isn’t a vector for cheating as it doesn’t interact with CSGO at all.
While testing this process out, I was able to stream CSGO and capture without introducing any noticeable latency to my gameplay besides a 10-20fps drop, but I have yet to extensively test it.
Capturing and Streaming CSGO
In order to make this work you are going to need a few things:
A Nvidia GPU with an NVENC encoder
You can find out if your GPU has this by referencing Nvidia’s chart here. Luckily as of the most recent driver update 531.41, they have quietly increased the max number of concurrent NVENC encoding sessions from 3 to 5. This should be more than enough encoding sessions in order to make this work, but if you wish to bypass this altogether there is an unsupported patch that allows for unlimited sessions here.
The OBS-NDI plugin
This plugin allows you to receive and send NDI from OBS easily.
IMPORTANT: As of writing this article obs-ndi only supports OBS version 28 and older. The dev is working on support for OBS 29, but they do this for free, so please be patient. It is possible to download older versions of OBS from their Github page here. You can also donate to the dev of this tool here.
NDI Tools Version 5.5
NDI Tools is a free program that allows you to take advantage of many different broadcast tools revolving around the NDI standard. For the purposes of this we will need the whole program, but the NDI Screen Capture section is the only one that we care about (as well as installing NDI on the system).
Now that you’ve installed these, the process for setup is fairly straightforward:
Please note this installation/setup guide is currently only for Windows. Screen Capture HX is not supported on Mac or Linux due to their dodgy Nvidia compatability/drivers.
1. Open up NDI Tools and in the top right corner click the settings cog for “Screen Capture” (not the general settings cog).
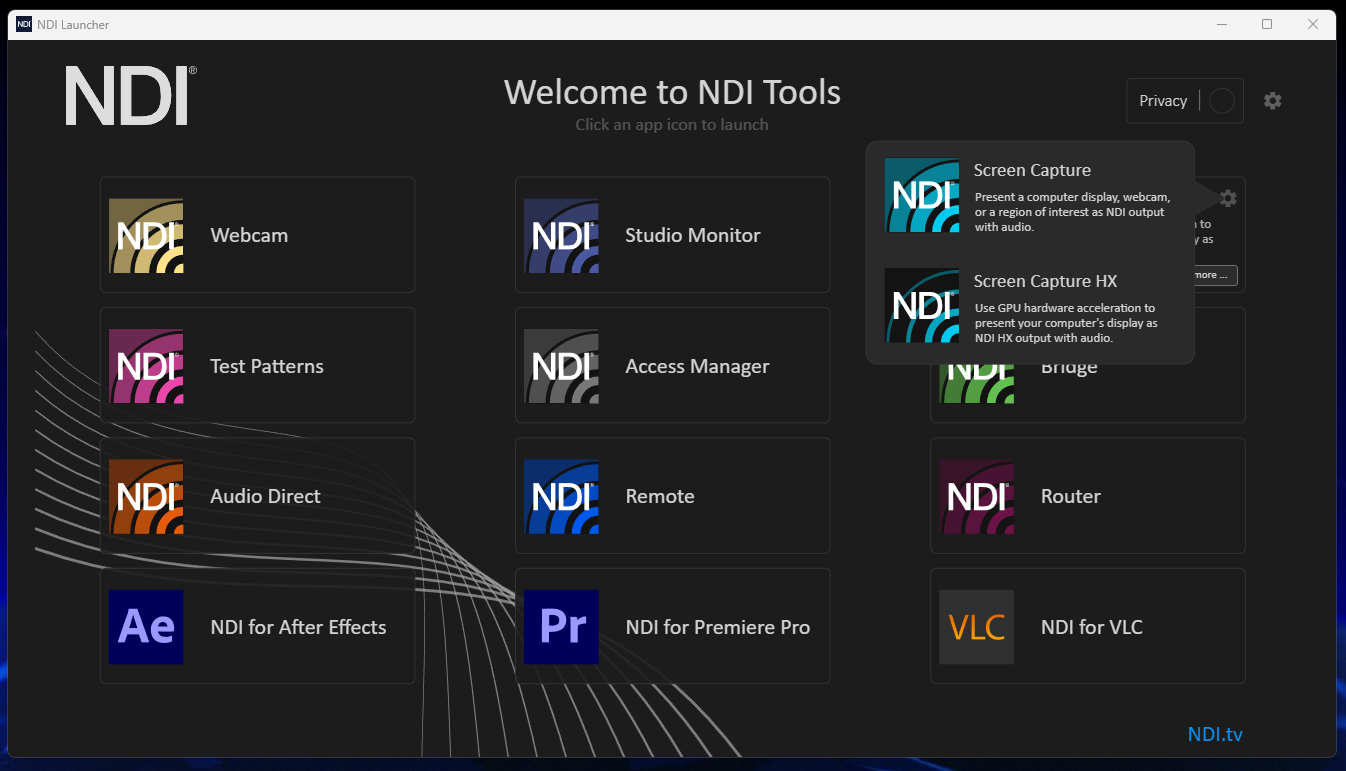
The NDI Tools Menu
From here you’ll want to click on Screen Capture HX. It won’t do anything noticeable from this menu, so once you’ve clicked this you can minimize the window.
2. Open the Screen Capture HX menu in the system tray and right click the NDI icon.

NDI Capture HX menu in windows system tray
From this menu you can configure the settings for your NDI stream. The settings I would recommend for CSGO streaming (depending on your GPU) are:
Video Bandwidth: Ultra or High, H.264
(You can use HEVC which will utilize H.265, but I have not tested whether or not this meaningfully improves or degrades performance).
Video Resolution: Monitor Resolution
You can change this to whatever you’d like, but depending on your CSGO resolution, this is most likely to be optimal.
Video Frame Rate: 60 Hz
Wait, didn’t you just tell everyone that this could do 120 Hz and above? Yes, yes I did. However, streaming services like Twitch or YouTube generally limit you to 60fps, and increasing this will use more bandwidth and put a higher load on your system hardware.
Audio Source: Whatever is your main output!
From there, your screen capture should be up and functioning!
3. Add the NDI source to your OBS profile

OBS Add sources menu
This part is pretty simple, go to your sources menu in OBS, and add the NDI 5 Source to your scene.
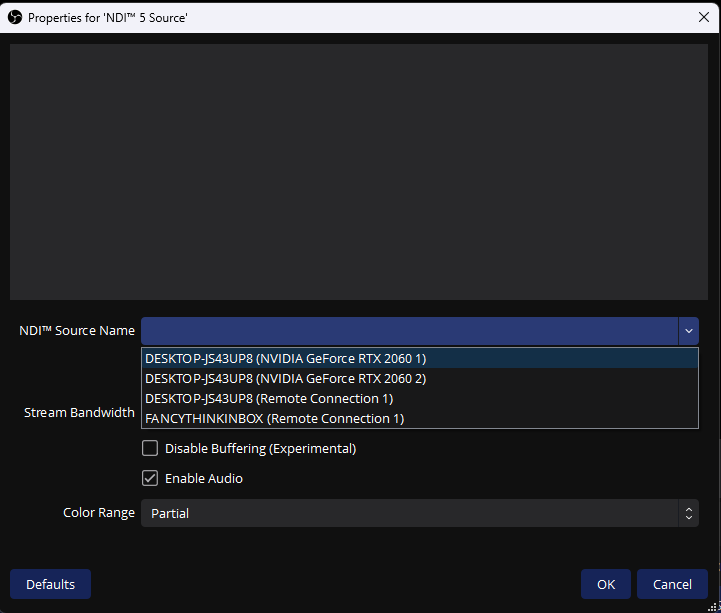
NDI OBS Source menu
From this point configure your NDI source in OBS by selecting your selecting the screen you wish to capture. I have a few things running on my network so I have four options in the menu, but for your case, it should just show COMPUTERNAME (Graphics Card Name #) where the # represents which screen it is capturing. This part will only show up if you have multiple monitors on your gaming system.
Note: If you wish to game on one system, but stream on another without a capture card, simple install OBS/OBS-NDI on the streaming computer, and install NDI Tools on both systems.
From here make sure that Stream Bandwidth is set to Highest (if you have performance issues you can use lowest but I wouldn’t recommend it), and from there the only thing left is Color Range. The options for this are Partial & Full. Use your judgement on this as if you’re using the wrong one the video will look significantly more gray/low contrast.
Ta-da!
And there you have it! You should now be able to capture your CSGO or any other game/application without needing an extra capture card. You can run your game in Fullscreen without the -allow_third_party_software launch option with minimal performance impact!
Please leave a comment or drop me a follow! I wrote this guide pretty quickly over the course of a few hours, so please forgive any minor grammar or formatting errors.
If you’d like to support me (not expected or required) you can use my link here.